So, you’re diving into the world of IoT and Raspberry Pi? Well, buckle up, because this is where the magic happens! If you’re looking for the best SSH methods to connect to your IoT devices powered by Raspberry Pi, you’ve come to the right place. Whether you’re a beginner or a seasoned techie, SSH (Secure Shell) is your go-to tool for secure and efficient remote management. Let’s break it down and make sure you’re set up for success!
SSH isn’t just some random tech jargon—it’s your golden ticket to controlling your Raspberry Pi and IoT devices remotely. Imagine being able to tweak settings, run scripts, or debug issues from the comfort of your couch. Sounds pretty cool, right? But with so many options out there, how do you choose the best SSH method for your IoT setup? That’s exactly what we’re here to figure out.
Before we dive deep into the nitty-gritty, let’s get one thing straight: SSH isn’t just about typing commands in a black screen. It’s about security, efficiency, and making your life easier. So, whether you’re building a smart home, automating processes, or just experimenting with cool projects, the right SSH setup can make all the difference. Now, let’s get started!
Read also:2nd Hand Chess Sets A Comprehensive Guide To Finding The Perfect Pieces
What Is SSH and Why Does It Matter for Raspberry Pi?
Alright, let’s start with the basics. SSH, or Secure Shell, is like a super secure tunnel that lets you connect to your Raspberry Pi and IoT devices remotely. Think of it as a secret handshake between your computer and your Pi. Instead of physically plugging in a monitor and keyboard, you can control your device from anywhere in the world. Pretty neat, huh?
Here’s why SSH matters for Raspberry Pi:
- Security: SSH encrypts all your data, keeping prying eyes away from your commands and files.
- Convenience: No need for a physical display or peripherals. Just a laptop and an internet connection will do.
- Efficiency: You can automate tasks, run scripts, and manage multiple devices without breaking a sweat.
But here’s the deal: not all SSH methods are created equal. Some are faster, more secure, or easier to set up than others. That’s why we’re going to explore the best options for your Raspberry Pi and IoT setup.
Top SSH Clients for Raspberry Pi IoT Devices
Now that we know what SSH is, let’s talk about the tools you’ll need to make it work. There are tons of SSH clients out there, but we’re going to focus on the best ones for Raspberry Pi and IoT projects. Here’s the scoop:
1. PuTTY: The Classic Choice
PuTTY has been around forever, and for good reason. It’s simple, lightweight, and works like a charm for Raspberry Pi. Here’s why PuTTY is still a top contender:
- Easy to install on Windows
- User-friendly interface
- Supports SSH, Telnet, and serial connections
But let’s be real—PuTTY isn’t exactly cutting-edge. If you’re looking for something more modern, keep reading!
Read also:Ohio Valley Garage Sale The Ultimate Guide To Finding Hidden Treasures
2. OpenSSH: The Default Option
OpenSSH is already installed on most Linux distributions, including Raspbian (the official OS for Raspberry Pi). It’s open-source, secure, and highly customizable. If you’re using Linux or macOS, OpenSSH is probably already on your system.
Why choose OpenSSH?
- Pre-installed on Raspberry Pi
- Highly secure with strong encryption
- Supports advanced features like SSH tunnels and port forwarding
OpenSSH is the go-to choice for most Raspberry Pi users, and for good reason. It’s reliable, fast, and easy to configure.
Setting Up SSH on Your Raspberry Pi
Alright, let’s get our hands dirty. Setting up SSH on your Raspberry Pi is easier than you think. Here’s a step-by-step guide:
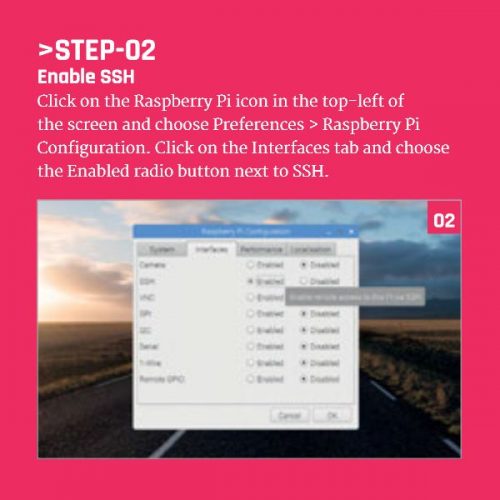
Step 1: Enable SSH on Raspberry Pi
First things first, you need to enable SSH on your Pi. Here’s how:
- Boot up your Raspberry Pi and log in.
- Open the terminal and type
sudo raspi-config. - Navigate to
Interfacing Options>SSH>Enable. - Reboot your Pi with
sudo reboot.
That’s it! SSH is now enabled on your Raspberry Pi.
Step 2: Find Your Pi’s IP Address
To connect to your Pi via SSH, you’ll need its IP address. Here’s how to find it:
- Open the terminal and type
ifconfig. - Look for the
inetaddress under thewlan0oreth0section.
Got it? Great! Now you’re ready to connect.
Best Practices for Secure SSH Connections
Security should always be your top priority when working with IoT devices. Here are some tips to keep your SSH connections safe:
1. Use Strong Passwords
Weak passwords are a hacker’s dream. Make sure your SSH login credentials are strong and unique. A good password should:
- Be at least 12 characters long
- Include a mix of uppercase, lowercase, numbers, and symbols
- Avoid common words or phrases
2. Enable Key-Based Authentication
Instead of using passwords, you can use SSH keys for authentication. This adds an extra layer of security and makes your connections more secure. Here’s how to set it up:
- Generate a key pair on your computer with
ssh-keygen. - Copy the public key to your Raspberry Pi with
ssh-copy-id. - Disable password authentication in
/etc/ssh/sshd_config.
With key-based authentication, even if someone guesses your password, they won’t be able to access your Pi.
Advanced SSH Features for IoT
Once you’ve mastered the basics, it’s time to level up your SSH game. Here are some advanced features you can use with your Raspberry Pi:
1. SSH Tunneling
SSH tunneling lets you securely access services on your Raspberry Pi from anywhere in the world. For example, you can use it to access a web server or database running on your Pi. Here’s how:
- Open a terminal and type
ssh -L [local_port]:localhost:[remote_port] [username]@[pi_ip]. - Access the service on your local machine via
localhost:[local_port].
2. Port Forwarding
Port forwarding is another powerful feature of SSH. It allows you to redirect traffic from one port to another, making it easier to manage multiple services on your Pi.
Common SSH Issues and How to Fix Them
Even the best tools can have hiccups. Here are some common SSH issues and how to solve them:
1. Connection Refused
If you’re getting a “Connection refused” error, it usually means SSH isn’t enabled on your Pi. Double-check that SSH is enabled in raspi-config and that your Pi’s IP address is correct.
2. Permission Denied (Public Key)
This error usually happens when your SSH key isn’t properly configured. Make sure your public key is in the ~/.ssh/authorized_keys file on your Pi.
Real-World Use Cases for SSH in IoT
SSH isn’t just a theoretical tool—it’s a practical solution for real-world IoT projects. Here are some examples:
1. Smart Home Automation
With SSH, you can remotely control smart home devices like lights, thermostats, and security systems. Whether you’re at work or on vacation, you can keep an eye on your home and make adjustments as needed.
2. Remote Monitoring
SSH allows you to monitor your IoT devices in real-time. You can check system logs, view sensor data, and troubleshoot issues without being physically present.
Conclusion: Your Path to Secure IoT Management
So, there you have it—the best SSH methods for your Raspberry Pi IoT devices. Whether you’re using PuTTY, OpenSSH, or another client, the key is to choose a tool that fits your needs and skill level.
Remember, security is paramount when working with IoT devices. Always use strong passwords, enable key-based authentication, and follow best practices to keep your connections safe. And don’t forget to explore advanced features like SSH tunneling and port forwarding to take your projects to the next level.
Now it’s your turn! Try out these SSH methods and see which one works best for you. Got questions or feedback? Drop a comment below, share this article with your friends, or check out our other guides for more Raspberry Pi goodness. Happy tinkering!